

Over the past few weeks I’ve been practicing something called Double Unders as much as I can. It’s one of those skills in CrossFit I was so close to being able to actually do, unlike something like Handstand pushups or Pistols.
Double unders are when you are jumping rope and you get the rope under you twice per jump. Sounds easy? Oh it is not.
I recently switched to a speed rope, which is basically a wire covered in some rubber insulation. It moves fast, and hurts like nobody’s business when it suddenly comes to a stop against your skin.

Every morning, I start the day whipping myself. Even though I have a pretty high tolerance for pain, there were quite a few times it smarted so much it was tear inducing.
The weird part was I was only whipping myself on the right side of my body. My arm, hand, leg and buns….covered in a lovely array of bright red welts from the rope. Sexy….especially since I did this before hopping on the treadmill when at the gym.
I’d take pictures of these marks, but taking pictures in the locker room is probably not very appropriate.
It all started paying off recently. I actually started stringing them together! First it was just a couple, then three and four. Albeit, with a single hop in between each, but it was progress! Then I had a brief moment of success. Yesterday, I finally strung three together continuously! All that whipping was finally paying off!
Even though the saying goes “Good things come to those who wait”, what it doesn’t say is, persistance is key along with patience in order to achieve.
Case in point….Cinnamon Rolls.
Cinnamon rolls take forever to make. But the reward is worth it.
The main reason why cinnamon rolls take forever to make is because they are a yeast based roll, so there’s going to be time for rising….twice.
To make these, I used components from two different recipes. For the bun, I used a recipe for a basic Sweet Dough from the America’s Test Kitchen Family Baking Book. For the filling and the glaze, I used the recipe from the Joy the Baker Cookbook.
Cinnamon Rolls (adapted from America’s Test Kitchen Family Baking Book and Joy the Bakers Cookbook)
I wasn’t sure if my yeast was still good. I have been storing it in my freezer for awhile and I couldn’t remember for how long. So, I had to change up the order of things a bit.
Put 3/4 cup of buttermilk into a small sauce pan over low heat to gently heat it up to about 110 degF. Basically warm to the touch. When heating up, buttermilk starts to separate, which I thought was odd…but I kept going.
Once warm, put in 1 packet of instant yeast (2 1/4 teaspoons) and a teaspoon of sugar and give it a good stir. This is basically to test the yeast and make sure it is still alive. Mine didn’t obviously foam, but there was a pleasant yeast fragrance that was being emitted, and while looking very closely at it, I could see it foaming a bit. Good enough!
Once you see that the yeast is still good. Mix/whisk in 6 tablespoons of butter (melted), then 3 large eggs (at room temperature).
In the bowl of your mixer, combine 4 cups of all purpose flour, 1/4 cup sugar (or really, 1/4 cup minus the teaspoon from before) and 1 1/4 teaspoon salt.
With the dough hook attachement, mix the dry ingredients till combined. Pour in the wet mixture in with the dry and put the mixer on low speed. This will take a couple of minutes, and don’t worry, the dough will come together by itself.
Once it comes together, put the mixer on medium speed and let it go for 5 minutes. After 5 minutes, if the dough is still kind of sticking to the sides of the bowl, add in a tablespoon of flour (don’t stop the mixer). Keep adding a tablespoon of flour until the dough stops sticking to the side, but still sticks to the bottom (I had to add about 3-4 tablespoons). Let it continue mixing another 5 minutes until the dough looks smooth and elastic (to check that, stop the mixer and poke the dough. If it bounces back, it’s elastic).
Remove the dough from the bowl. It will feel super sticky. On a very lightly floured surface, and with lightly floured hands, knead the dough a couple of times and form into a smooth ball. Put the ball of dough into a lightly oiled large bowl. Cover with plastic wrap and put in a warm area to let it rise for two hours.
As it is rising, make the filling.
In a bowl, combine 1/2 cup of sugar, 1/2 cup of lightly packed brown sugar, 1/2 cup chopped pecans, 1 tablespoon cinnamon, pinch of ground cloves, 1/2 teaspoon salt and 3 tablespoons maple syrup. Mix it all up with your hands and set aside until the dough is ready.

Once two hours has passed and the dough is now double its original size, melt two tablespoons of unsalted butter.

Flour a clean surface. Take the dough out of the bowl and press the dough out into a 12 x 16 inch rectangle. I used a ruler to make sure. Brush the melted butter over the surface of the rectangle. Spread all of the filling evenly over the entire rectangle, leaving a 3/4 inch space along the end of one of the shorter sides (for sealing purposes). Roll it up and seal the seam. Roll over the roll (ha!) so the seam is now on the bottom of the roll. Gently stretch the roll out a bit so it’s about 18 inches long and with an even diameter.

With a serrated knife and a light hand, cut up the roll into 12 equal sized slices.

Place the slices into a lightly oiled 9 x 13 inch pan. Cover with plastic wrap and let it rest in a warm place for another 1.5 hours or so. Until the rolls have risen enough to smoosh into each other.

Bake the risen rolls in a 350 degF oven for about 25 minutes, until they are golden and puffy.

Take them out of the oven and brush any remaining melted butter over them and let it rest for a few minutes before flipping them out onto a wire rack. Flip them over again (use another rack) so they are now right side up.

To make the glaze, whip in 1/4 cup of buttermilk into 2 cups of powdered sugar. Since my brother used all my powdered sugar last week for his red velvet cake, at this point I realized I had no powdered sugar. This is why you check your supplies before starting! I did however have some powdered sugar that had some cinnamon in it that I had kept around for whatever reason. It was just enough for one bun.
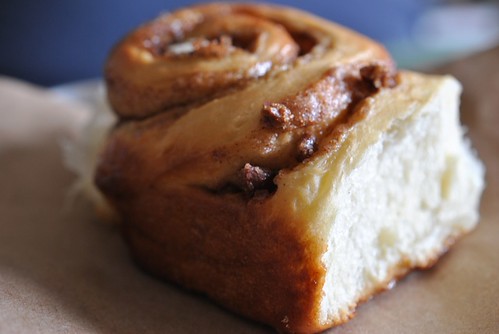

The bun itself was awesomely soft and easy to pull apart. The filling was sweet and sticky, but not overwhelmingly so like the stuff you get from the mall.

After I finally finished photographing the bun, we dug in and I was in heaven. Worth all that effort. Now if only I can stop picking at the rest of them! Otherwise, I’ll need to keep doing more double unders to burn these off!

Mouthwatering. I need to try these.
Making cinnamon buns are a pain in the butt, but it’s so worth the effort. 😉
I love that you added pecans to them. Yum.